Medius AP Automation
Top Tips
Explore each category and click on any tip to learn more.
Force a comment on a rejected invoice
Use temporary delegation when you are on vacation
Filtering invoices that have been returned from Review
Temporary delegation
Pre-Approved Invoices
Saving and reusing filters
Using bulk operations in the Inbox
Optimal use of additional charges
Increase your automatic connection rate with connection tolerances!
Working with PO invoices and optimizing the line details grid
Configure which columns are visible in your Inbox
Adding Quick Links to Medius Admin Pages
Save time by autocoding in Post Control
Prioritize missing Goods Receipts
Managing Supplier Responsible using the Routing Table
Review your Admin role assignments
Get the most out of Medius Copilit
Creative use of Coding Restriction Rules to drive automation
Four Eyes Principle for approvals
Create a Teams channel for Medius users!
Stay updated with Medius!
Working with Medius Support
Discover what's new in Medius interface
Emailing suppliers within Capture
Subscribe to Updates from Medius Cloud Operations
Improve Invoice Accuracy with Medius Analytics
Gain line level reporting visibility on non-PO invoice spend
Dashboards v Reporting v Analytics
Identifying suppliers that are causing you extra work
Configure supplier invoice summary
Straight to Archive function
Medius report data into 3rd party tools
Struggling with duplicate suppliers? Try this reporting trick
Increase accuracy and save time with associative reference learning in Capture
Save time by onboarding suppliers directly from Capture
Increase automation by deactivating the currency field in Capture
Known issue tracking
Reprocessing invoices in Capture
Paste coding from Excel
Using document reason codes for identifying business process issues
How Medius Capture learns
Getting value out of Medius Payments
Route invoices by store or location using associative learning
Struggling with duplicate suppliers? Try this reporting trick


Keep your ERP integration up-to-date for smooth operations


Meet your three Admin superpowers (and when to use each)
The Squad
-
Admin – The System Owner: Has the keys to everything: all documents, system configuration pages, approval groups, and follow-up groups. Also inherits the user-management abilities defined for User Admin.
-
User Admin – The People & Access Manager: Owns user accounts and roles from the admin pages: can reset passwords, update user settings, and assign roles—within their company sub-tree. They can adjust non-company settings for all users, but there are safety rails (see below).
-
Business Configuration Admin – The Workflow Builder: Focused on the business flow: manages approval groups and follow-up groups (and does not have the full system-wide powers of Admin).
Decision Cheat Sheet (bookmark this!)
-
“I need to tweak system settings or see all documents.” → Admin
-
“Add/remove a role for a colleague in my business unit.” → User Admin (within your company sub-tree)
-
“Reset someone’s password.” → User Admin
-
“Design or update approval and follow-up groups.” → Business Configuration Admin(or Admin)
-
“Create/maintain approval groups for a new department.” → Business Configuration Admin
-
“Company-wide configuration work.” → Admin
Route invoices by store or location using associative learning
Step-by-step
-
Pick your store code format: Decide on a consistent code you’ll route on (e.g., Associated Store Number, like for example, Store 6651). Keep it short and unique across stores.
-
Teach Capture the code (Associative Reference Learning)- In Capture, rope/select the street number and name from the Ship To block (or wherever it appears on the invoice) into the Reference field.- Edit the Reference to your chosen normalized format (e.g., change 123 Anywhere Street to Store 6651).- Do this two times for the same supplier so Capture learns the transformation. Next invoices from that supplier will auto-adjust the Reference to your normalized code.

-
Create roles for each store- In Medius (Admin), create a custom role that exactly matches your normalized Reference (e.g., Store 6651).- Assign the user(s) who own approvals for that store to this role.

-
Test & go live
-
Import a few invoices from the target supplier(s).
-
Confirm Reference auto-populates to your normalized code, and the invoice routes to the matching role without manual touch.
Getting value out of Medius Payments
Powerful filtering
- Status – Instantly switch between tabs showing invoices that are available to pay, in process, issued & paid, ERP synchronised, or simply view all of them together.
- Due date – Identify upcoming due dates and take advantage of early payment discounts.
- Amount – Easily track high-value invoices to ensure they’re paid on time, helping you maintain strong supplier relationships.


Role-based approval flow
-
Review all invoices due for payment on a single screen.
-
Create a payment batch and send it to the relevant approvers.
-
Your CFO or Financial Controller approves the batch directly in Medius.
-
Payments are processed securely, with full visibility at every step.
Video guide to pulling Medius report data into 3rd party tools (PowerBI, Tableau, Excel etc.)

Here's a short step-by-step guide to securely pulling report data from Medius, on demand:
A reminder on how Medius Capture "learns"

Using Four Eyes Principle for approvals is not "All or Nothing"
-
Non-PO invoices
-
PO invoices
-
Recurring invoices
-
Payment requests


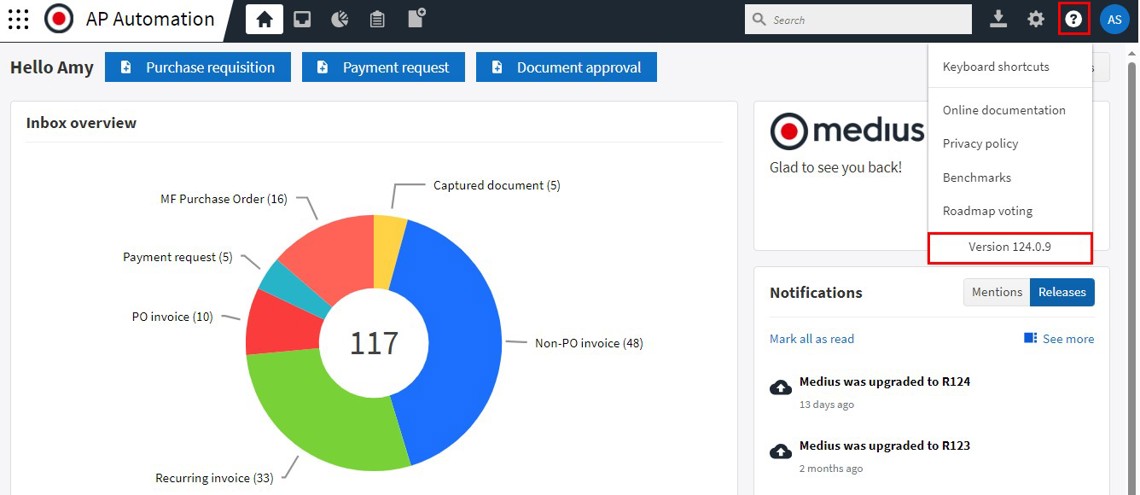
Discovering What's New in Medius, directly in the product


Archiving documents directly for reporting and traceability
-
Pro-forma invoices
-
Invoices with a 0 total amount
-
Duplicate invoices
-
Cross-company or internal invoices
Temporary delegation
-
Ensure Continuity: Maintain the flow of invoice approvals without interruptions, ensuring no delays in processing.
-
Be Proactive: When you have planned your holiday, proactively set the delegation period so it automatically kicks in the day you leave.
-
Retain Control: Set an end date for the delegation period, so tasks revert to you automatically once you're back.
-
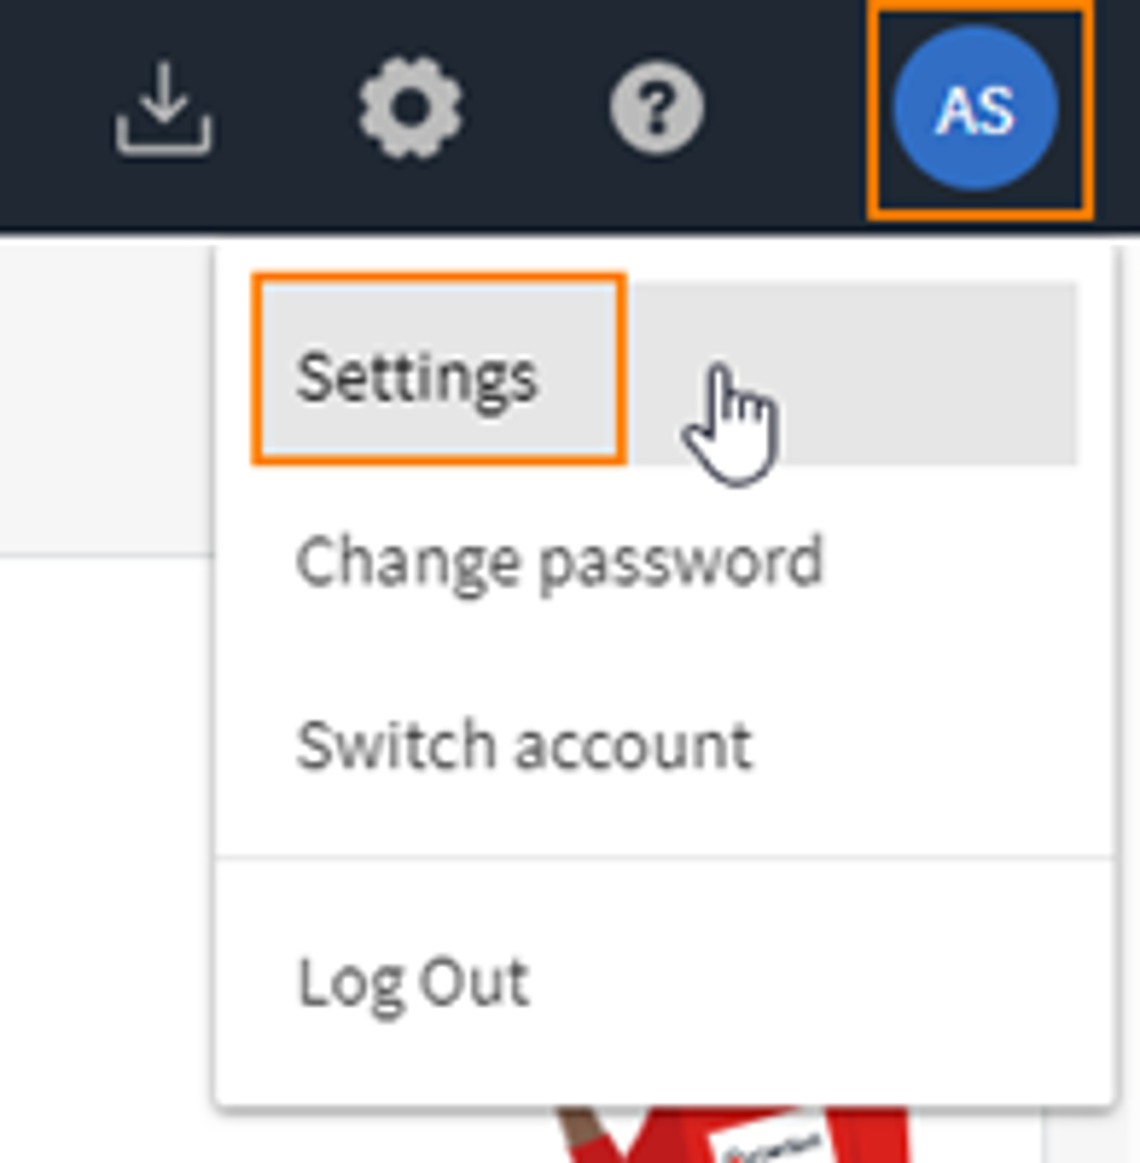
In the top, right hand corner, click on your initials, then Settings.
-
Select Temporary Delegation and click +Add.
-
Set the start and end dates for the delegation period.
-
Choose the colleague you wish to delegate tasks to.
-
Select if you want the delegation type to be User, Role or User and Role*
-
Click Save.


-
An admin user can set up temporary delegation on behalf of other users, if necessary.
-
When a delegation is established, both the existing and the new tasks are assigned to the delegatee.
-
Even after setting up temporary delegation, the original owner of the task still has the tasks in their inbox. When the task is handled, it disappears from both inboxes.
Creative use of Coding Restriction Rules to drive automation


Known Issue Tracking
AccessKnownIssues key assigned.
-
Search by issue ID, title, product, or status.
-
Issues appear in one of the following statuses: Open, In Progress, Fixed, Declined.
-
Click any issue to view details like status, description, and resolution timeline.
-
Issues are retained for 180 days after they’re resolved, so you always have context.
Getting the most out of Medius Copilot
Configuring the "at-a-glance" supplier invoice summary


Subscribe to Updates from Medius Cloud Operations


Select the cloud your tenant is running on:...

... and scroll down the page for any additional components included in your subscription...

... and any managed integrations to your ERP where applicable...

... and hit "Save".

Review your Admin role assignments
Configure which columns are visible in your Inbox

-
Please note: this will change the column configuration for all users in your Medius environment
-
You need to be an admin-user to make this change
-
Go to Administration > Folder
-
Select My tasks > Editor for column configuration
-
In the list on the right, the Type indicates which folder you’re updating (e.g., Non-PO invoice, PO invoice, etc.)
-
Find the relevant Type, deselect the columns you want to hide, and select the ones you want to show. You can also search for a column name under Name.


Using bulk operations in the Inbox
Speaking with customers recently, one topic cropped up a number of times and it became apparent that perhaps through staff changes, some of the operational "muscle memory" in using Medius is lost. Well, hey, that's the intent of these quick Top Tips from Customer Success!
So, in observing a backlog of invoices in Post Control, the user was unaware that there is an opportunity for a bulk operation. By selecting multiple invoices of the same type and step in the workflow, the "Bulk Operation" button becomes active, and the user is guided through the next steps. We often see this bulk operation for Final Approval, rather than having to open each individual invoice. That's super convenient!
Full documentation on the Inbox is found on the Medius Success Portal here, which details other bulk operation capabilities.
Have a productive day!
Managing Supplier Responsible using the Routing Table
As you're aware, Medius comes with a whole set of default business rules that can be activated and deactivated and prioritized to drive workflow behavior, for example.

One common approach is to use Supplier Responsible to determine a user or role that should receive invoices for a specific supplier.

However, this can lead to a bit of a maintenance/administration headache. For example, if Evelyn above is responsible for 50 suppliers, should her role change or she leaves the company, then an Admin would need to reassign the supplier responsible to Penny or whomever by manually updating each supplier individually. Could be quite a chore.
Use of the Routing Table could be a useful approach as it provides a convenient Excel template export/import function that would allow for the bulk update of supplier responsible outside of the Medius Administration UI.

Saving and reusing filters
This one’s short and (hopefully) sweet!
If you’re an AP user in Medius, chances are your inbox is flooded with invoices daily. Filters are a great way to focus on the invoices you need to see, but did you know you can save and reuse the filters you use most frequently?
Check out this quick video to learn how to save time by creating reusable filters!

Emailing suppliers within Capture
Effective communication with suppliers is crucial for smooth invoice processing. Medius has introduced a feature that allows you to email suppliers directly during the invoice verification process, enhancing efficiency and collaboration.
Benefits of Emailing Suppliers During Invoice Verification:
- Immediate Clarifications: Quickly resolve discrepancies or obtain missing information by contacting suppliers directly from the verification interface.
- Enhanced Record-Keeping: Maintain a clear communication trail within the system, ensuring all interactions are logged and easily accessible.
- Improved Efficiency: Reduce delays associated with external email platforms by centralizing communications within Medius.
How to Use This Feature:
- Access the Invoice: Open an invoice from the incoming invoice inbox.
- Initiate Email: Click on the "Email" button option within the invoice interface.
- Compose Message: Add a subject, message, internal user and the supplier.
- Send Email: Review and send the email.
Please note the following limitations when using this feature:
- The email sent from Capture cannot be replied to directly by the Supplier.
- The email content is not stored in Medius, except for an entry in the history indicating that an email was sent.
To avoid confusion, we recommend including a note in the email body, such as:
"Please note that this email cannot be replied to. Please direct any replies or new invoices to [insert your company’s email address]."
By leveraging this integrated emailing feature, you can enhance communication with suppliers, leading to faster invoice resolutions and a more streamlined accounts payable process. Check out this quick video to see how you can do this in your system.

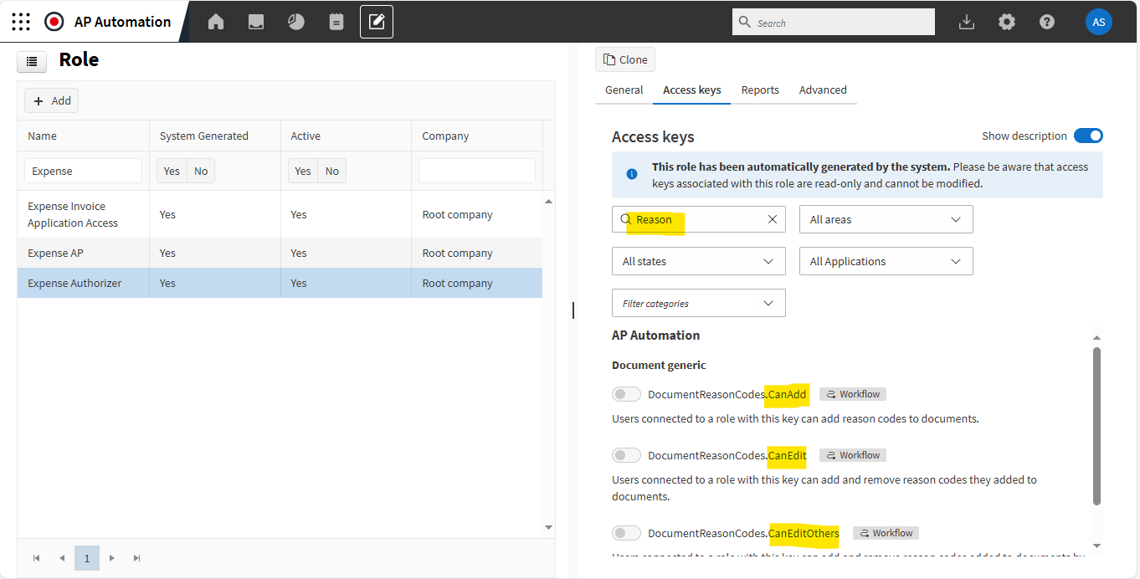
Use of these Reason Codes can be restricted via the use of Access Keys tied to a role.

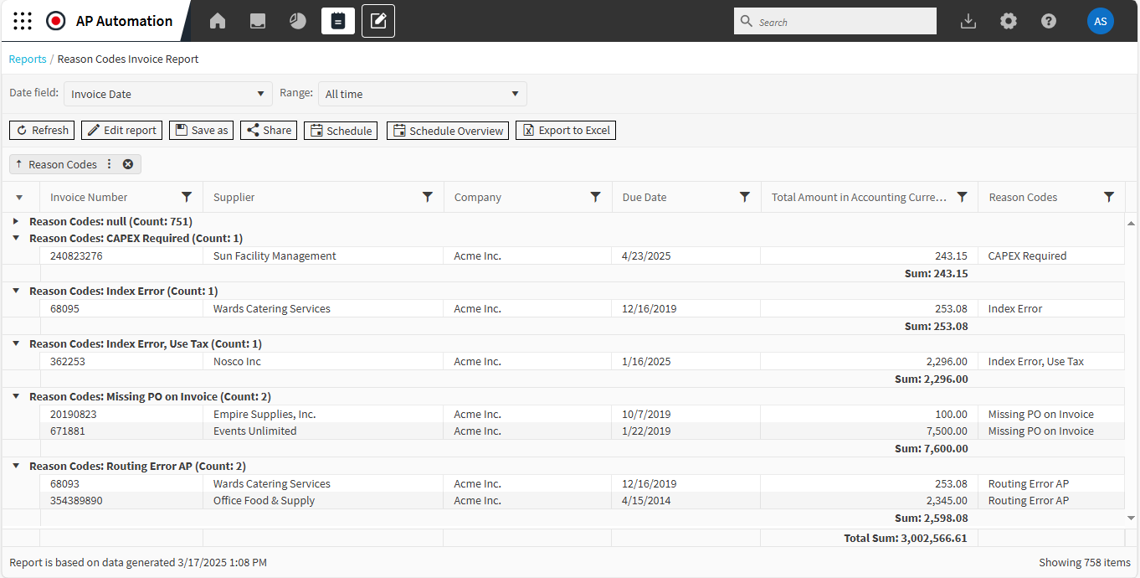
The Reason Codes can be included in reports to help identify specific suppliers or problems in the process that can then be focused on for improvement.

Using document reason codes for identifying business process issues
Also, take a look at the recording of our most recent webinar, Top Tips in Action, here.
Back to Top tips overview Share this tip
Force a comment on a rejected invoice
Have you ever encountered a situation in Post Control where a Non-PO invoice is rejected without any comment or additional information? This forces you to track down the person who rejected it to find out the reason or to request documentation that can be attached before invalidating the invoice. This process is time-consuming, and ideally, the necessary information should be included at the time of rejection.
This issue can be resolved by enabling a validator that requires users to add a comment when rejecting an invoice.
Please note that some of you may already have this validator enabled. For those who want to activate it, be aware that all rejected lines—including those rejected by AP staff—will require a comment. It's a good idea to inform all end users about this change so they know what to do when rejecting invoices moving forward.
To enable this validation, you must have the admin role assigned to your user. If you are an admin, follow these steps:
1. Click on Administration
2. Go to Validator configuration

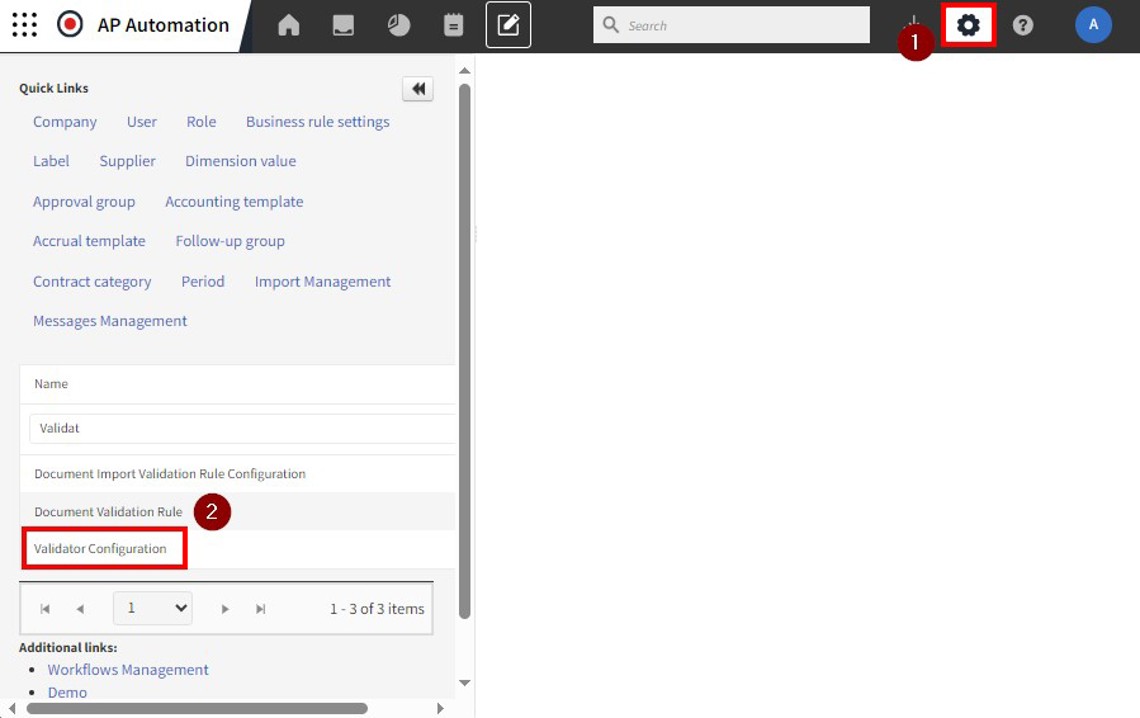
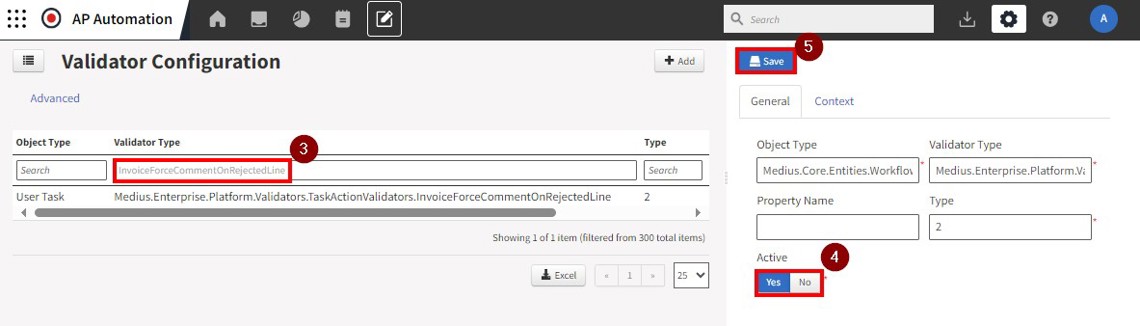
3. Search for the validator: InvoiceForceCommentOnRejectedLine and select it from the list
4. Set Active to Yes
5. Save your changes

As always, let us know if you have any questions!

Create a Teams channel for Medius users!
This tip is a bit different. Last week, while attending our customer conference, a client shared that the most impactful change they’ve made recently was setting up dedicated Microsoft Teams channels for their Medius users. They created one channel for all end users and another exclusively for super users.
This approach has helped them centralize communication since almost everyone uses Teams daily. It’s improved transparency and reduced repetitive questions. Plus, they can pin important messages or easily automate reminders, like when month-end is approaching.
Of course, this strategy works just as well if you use Slack or another internal communication tool.
If you have a large user base in Medius, you might want to collaborate with your IT department to set up the channels. For your convenience, here's a guide on how to create a channel in Microsoft Teams: Create a standard, private, or shared channel in Microsoft Teams - Microsoft Support
Back to Top tips overview Share this tip
Optimal use of additional charges
For those of you who process PO invoices in Medius, you will know that suppliers often include charges on invoices that are not on the Purchase Order. Common examples are freight, environmental fees and pallets. If additional charges aren’t properly configured in Medius, these charges will result in manual processing. So let's do a quick refresher to ensure everything is set up correctly!
Tips for optimal use of additional charges:
- Configure additional charges at both the company and supplier levels. This allows you to set up general limits and customize them for specific suppliers. For instance, you can set a higher amount limit for freight for certain suppliers while keeping a lower limit for all other suppliers.
- Use "SaC" (Same as Cost) for PO invoices. This option automatically populates coding dimensions and tax indicators based on the purchase order.
- Configure additional charges for non-PO invoices! This requires that you capture lines on Non-PO invoices. The limit you set here will determine if additional approval is required.
Maximizing automatic connection:
- Use wildcards (*) in the item number and description fields when applicable.
- Populate both the item number and description fields. Only one needs to match for an automatic connection. Example: The additional charge in the screenshot below will connect if "freight" appears anywhere in either the item number or the description on the invoice line.
Minimizing unnecessary stops in Analyze:
- Consider setting a higher amount limit along with a percentage limit. When multiple limits are in place, the lower of the two will always apply.
To configure additional charges at the company level:
- Go to: Administration > Company > Select Company > Enterprise > Additional Charges
To configure additional charges for a supplier:
- Go to: Administration > Supplier > Select Supplier > Enterprise > Additional Charges
Below is an example of an additional charge configured for freight, using many of the tips mentioned above. For more details on each individual setting, click here: Medius Success Portal - Additional Charges

Working with Medius Support
Here at Medius, the pace of innovation can be quite breathtaking! Well, you're likely to have noticed this through our monthly product updates and published release notes. It can be hard to keep up!
Exciting, but:
- Do you know how to engage with Medius Support to report an issue?
- Do you sometimes find dealing with Medius Support frustrating?
- Do you know what type of tickets Medius Support can help with?
- Would it help to understand how Medius is structured by 1st Line, 2nd Line, 3rd Line etc.?
- Did you know that you can provide feedback on your support experience directly after every ticket?
First, a snapshot/reminder of the various teams and services Medius offers to build and maintain a valued, trusted relationship with our customers.

To help clarify how Medius Customer Support fits in, we have updated a comprehensive Medius Customer Support Overview document that explains how you engage and how the teams log, investigate, escalate and resolve issues across Medius to better serve our customers.
Why is this helpful to you?
- Understand Support Levels and Services: Familiarize yourself with our 1st, 2nd, and 3rd line support tiers and know when and how to escalate issues.
- Ensure Faster Resolutions: Learn how to properly submit and track support tickets, including the details needed to speed up the process.
- Know Your Resources: Discover the full range of support tools available to you, from the Medius Support Portal to proactive resources like the Medius Success Portal.
Most customers only submit a handful of tickets so it may be an idea to download or bookmark this document to have it handy whenever you need support from us. Keeping this overview accessible will help you navigate the support process smoothly, ensuring minimal business interruptions and expedited resolutions.
You can access the full Medius Customer Support Overview documentation on the Medius Customer Center, with a direct link here.
Let us know if these types of "Top Tips" are useful so we can work to deliver meaningful self-service content. Also, let us know if you'd like to have other colleagues receive these Top Tips.
Increase accuracy and save time with associative reference learning in Capture
Many of our customers use the reference field for routing Non-PO invoices and have provided feedback that the text on the invoice sometimes needs to be adjusted. This could be due to the supplier misspelling a name or entering the name of a department instead of a person. To address this, we have introduced a new feature: Associative reference learning in Medius Capture.
With this feature, you can:
- Automate Repetitive Corrections: If you find yourself repeatedly correcting the same reference value on invoices, Capture will learn from your adjustments. After just two corrections, the system will automatically apply the learned value to future invoices.
- Enhance Accuracy: For example, if you change "Sales Dept" to "Lloyd Braun", Capture will remember to use "Lloyd Braun" on all subsequent invoices, ensuring consistency and accuracy.
- Seamless Application Across Formats: This learning applies to both PDF and e-invoices, and it’s saved at the supplier level for each company, streamlining your workflow.

Additionally, for PDF invoices, you can quickly verify any changes by hovering over the Reference field icon, ensuring transparency in the automation process. Should you need to reverse this learning, simply enter the correct printed value on two invoices, and the system will relearn the original value.
By leveraging associative reference learning, you can save time on manual data entry, and focus on more value adding tasks.
Save time by onboarding suppliers directly from Capture
Managing invoices from new suppliers can be a very time consuming process. Usually it involves getting one or more internal approvals, a supplier validation step, followed by creating the supplier in your ERP and waiting for it to sync to Medius. All this happens while the invoice is just sitting in your queue in Capture, waiting patiently..
To streamline this process, we have developed a feature which allows you to start the supplier onboarding process directly from Medius Capture. It requires that you have the Supplier Management module in Medius. There are many benefits to this:
- The whole process will be in Medius, no need to switch between multiple systems
- Save time by quickly starting the onboarding process directly from Capture
- Reduce risk of duplicate suppliers in your ERP

Here’s how to get started with onboarding a new supplier:
- Click the Request a new supplier link underneath the Supplier field (available only if the Supplier field is empty). If the supplier field is incorrectly filled, remove the supplier to see the link.
- Complete the Request a new supplier form. The only mandatory field is the Supplier name, marked with an asterisk. If available, the invoice number will be included automatically.
- Click Submit to send the form to Medius Supplier Onboarding. Relevant users will be notified by email to process your request promptly.
If this feature is of interest to you or your company, but you do not have the Supplier Management module in Medius, let your Account Manager know and we will get in touch.
Increase your automatic connection rate with connection tolerances!
This one is about how you can increase your automatic connection rate for PO invoices using connection tolerances.
I am sure most of you have run into this at some point. A PO invoice will stop in the connect step, and when you go to do the manual connection, it looks something like this:

In this case, 2 out of 3 lines have connected automatically to the PO/GR lines. The remaining invoice line has the wrong item number, perhaps the vendor just left off the last digit by mistake. The total amount of the remaining line differs from the PO/GR line by only 0.20 SEK! It seems unnecessary that this invoice should stop in the connect step, considering there is only one open line left on the PO, and it only differs by a tiny amount.
Luckily, we can solve this by setting up a connection tolerance. This allows Medius to connect based on the total amount of the line, even though the amounts are not exactly equal. This should allow more lines to connect automatically, thereby increasing your overall automatic connection rate.
It can be set up on both company and supplier level. The screenshot below is what it would look like if you set up a line level connection tolerance of 0.50 SEK for this supplier.
To find this configuration page, click on the supplier name from the invoice, and go to the tab PO invoice - Tolerances. You can also check out this video to see how you set up a connection tolerance on company level. Note that the tab "Orderbased" has been renamed to "PO Invoice" since the video was created.

A couple things to note:
- Beware of setting the tolerances to high, this can result in incorrect connections
- You can set a value tolerance, percentage tolerance, or both!
- You can set up the same type of connection tolerance for Head level connections
Working with PO invoices and optimizing the line details grid
Particularly with PO invoices there is a wealth of information associated to the PO, the goods receipts and the invoice itself. Presenting all of this information can sometimes be a challenge when so much is related to the line level details.
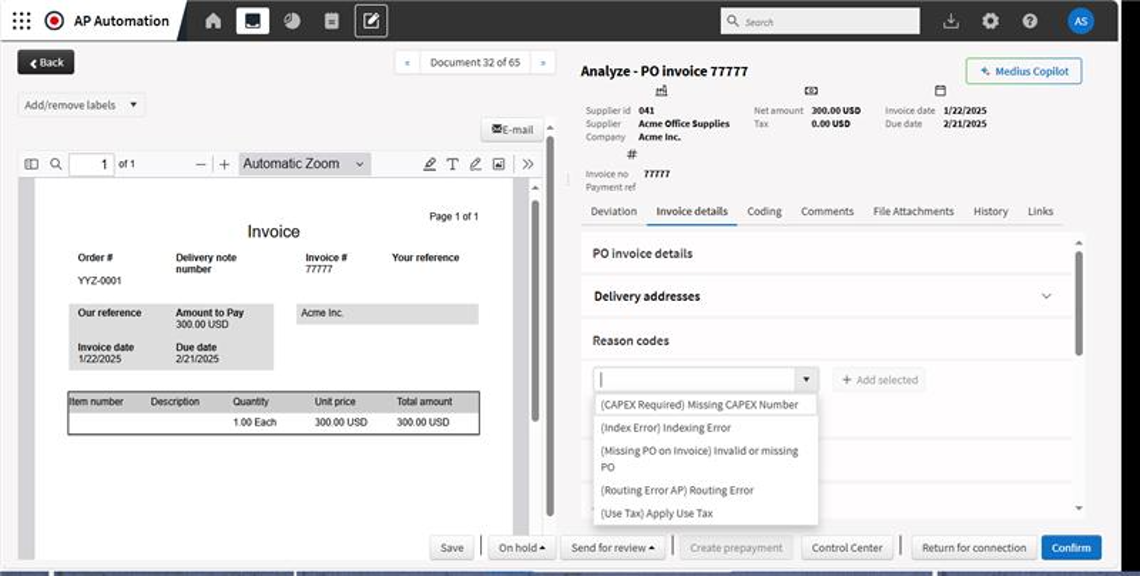
The various sections associated to the PO invoice are collapsible. The user can collapse and expand those sections as needed to see the underlying data related to PO invoice details, Reason codes, Posting details, Amounts and Payment information.
When it comes to Lines there can be up to eighteen fields of information available that may require horizontal scrolling to see the information needing your attention - particularly any unit price deviations or quantity deviations.


Each User can select which fields they want to see, and these settings are saved per User. For example, invoice line number, PO Number 2 or Additional PO numbers may not be relevant or useful for this User, so they can be deselected.
Oh and, of course, Users can search for items in each column and sort each column by clicking on the column headers.
Use temporary delegation when you are on vacation!
Have you noticed that the number of invoices out for approval tends to increase during the holidays? Managing your workflow efficiently is crucial, especially during periods of absence. To help with this, you should use the temporary delegation feature in Medius, so tasks are automatically delegated while you are away.
With Temporary Delegation, you can:
- Ensure Continuity: Maintain the flow of invoice approvals without interruptions, ensuring no delays in processing.
- Be Proactive: When you have planned your holiday, proactively set the delegation period so it automatically kicks in the day you leave.
- Retain Control: Set an end date for the delegation period, so tasks revert to you automatically once you're back.
To set up a temporary delegation, simply follow these steps in Medius AP Automation (or follow along this tutorial video):
- In the top, right hand corner, click on your initials, then Settings.
- Select Temporary Delegation and click +Add.
- Set the start and end dates for the delegation period.
- Choose the colleague you wish to delegate tasks to.
- Select if you want the delegation type to be User, Role or User and Role*
- Click Save.
- A task can be assigned to your user directly (such as a Non-PO invoice that needs to be approved), or to a role that is assigned to your user (such as a Non-PO invoice that needs to be routed to a user). "User" would be the right choice for most end users, while power users might want to choose "Role" or "User and Role"


Things to note:
- An admin user can set up temporary delegation on behalf of other users, if necessary.
- When a delegation is established, both the existing and the new tasks are assigned to the delegatee.
- Even after setting up temporary delegation, the original owner of the task still has the tasks in their inbox. When the task is handled, it disappears from both inboxes.
P.S. Many AP teams send a reminder about temporary delegations to end users before the holidays, so they don't forget to set it up. Feel free to steal the quick-guide from this e-mail and use it in the reminder
Improve Invoice Accuracy with Medius Analytics
Do you know how many of your invoices need to be modified after being imported into the workflow in Medius?
If you are a power user in Medius, you know how time-consuming this can be. Whether it’s correcting the invoice type, changing the supplier or adjusting the VAT amount, these changes require invalidating, editing, and resubmitting the invoice - an often lengthy process.
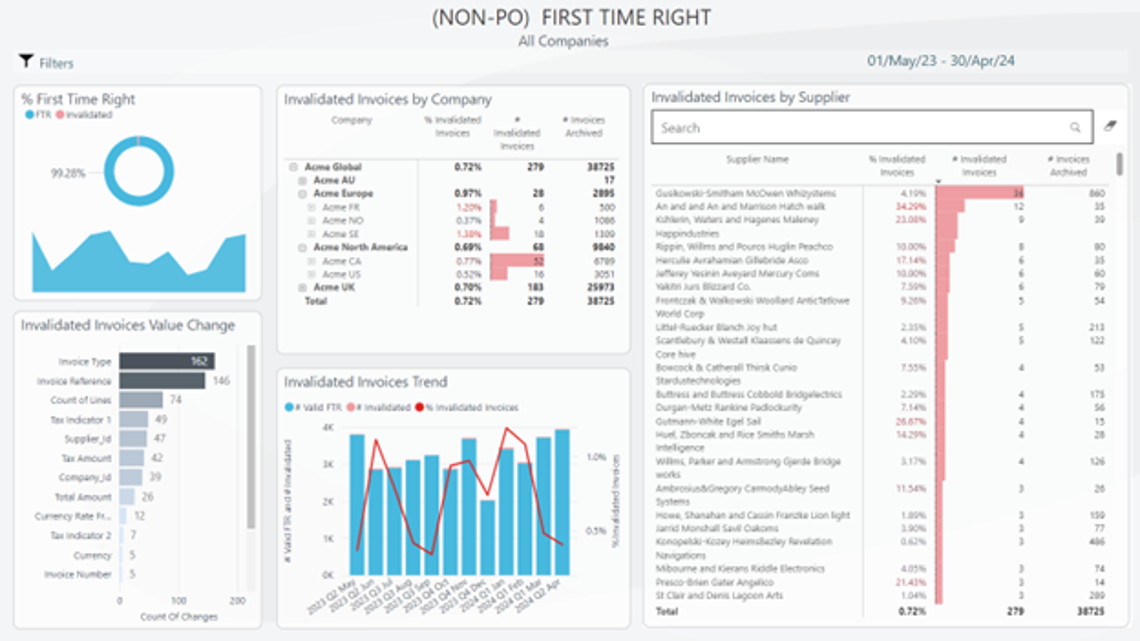
Previously, tracking these "invalidated and edited" invoices has been challenging. With Medius Analytics, you can now utilize the First Time Right dashboard to easily identify and track changes made to invoices. This tool helps you pinpoint which suppliers are sending invoices with incorrect information, allowing you to address issues directly with them and save valuable time. For instance:
"Last year, you sent us 65 invoices without a purchase order number. In the future, please ensure the order number is included in the correct field."
If you think this sounds interesting but you don't have access to Medius Analytics, let us know and we will get in touch with you!


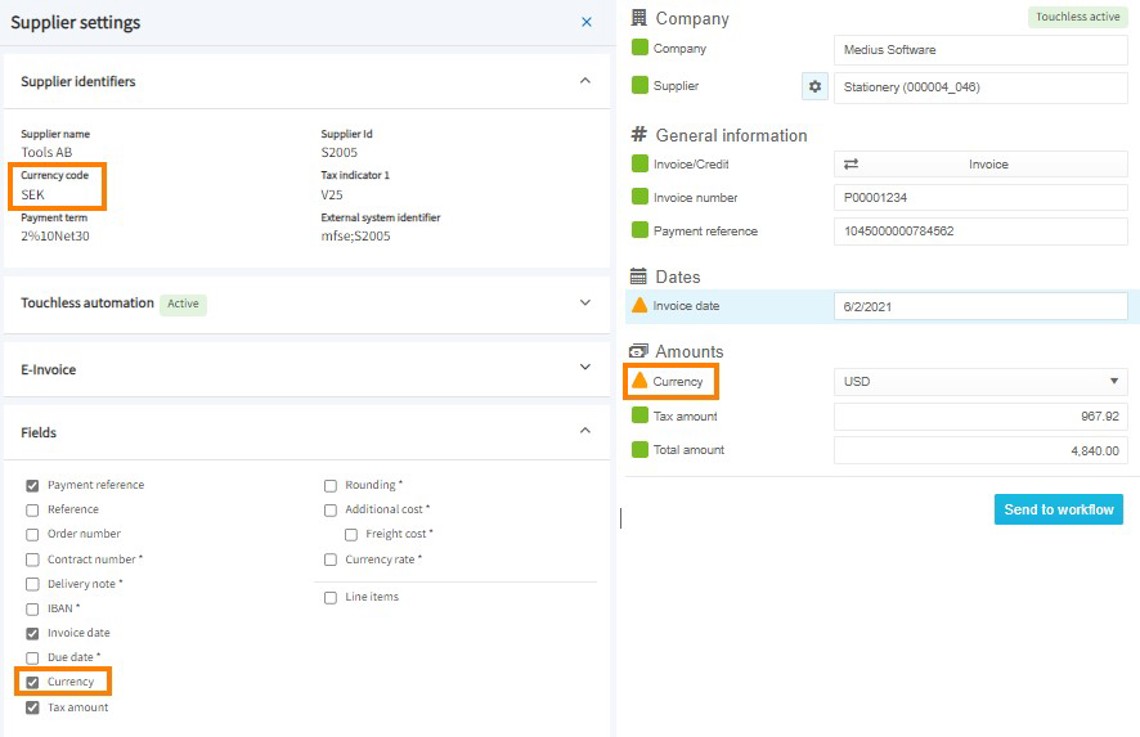
Increase automation by deactivating the currency field in Capture
When I meet with customers, many of you mention that capturing the currency of an invoice can be a hassle. It is often the only field that triggers a warning in Capture, while all other fields are green and captured correctly. This issue can negatively impact touchless automation in Capture and take up unnecessary time.
However, did you know that you can deactivate this field for specific suppliers? If a supplier only sends invoices in one currency, and that currency matches the supplier setup in your ERP, there is no need to use the field at all. Simply deactivate the field at the supplier level, and the invoice currency will always be set to the supplier's default currency.
With touchless automation enabled in Capture, these invoices can now be processed automatically, saving you time and a few clicks per invoice.
As you see in the screenshot, you can check the supplier currency directly in Capture.
Paste coding from Excel
We understand that many of you encounter invoices with a significant number of coding lines, such as a phone bill that needs to be divided among numerous employees.
Did you know that it is possible to paste coding lines directly from Excel into Medius? This can be especially helpful if you have large templates saved in Excel, or you are using formulas in Excel to calculate line amounts. When the invoice is in any step where you can add coding, simply click on the small arrow next to "Add," and you'll find the option "Paste coding lines from Excel." Take a look at the screenshot below, or check out this video on the success portal.
Before you copy and paste, make sure the number of columns in your Excel sheet matches the number of required columns in Medius.

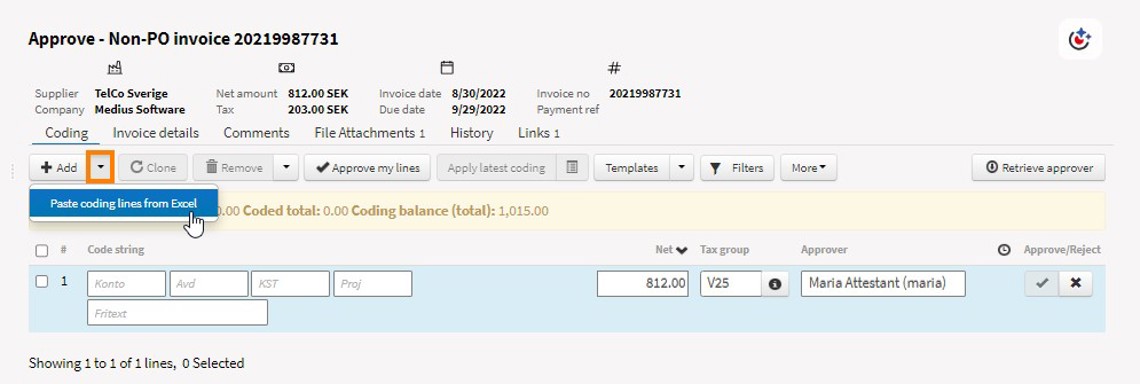
Some things to consider:
- The current limit for coding lines is 1500
- This works for non-PO invoices, PO invoices and payment requests
- Check out this article on the success portal for more details
As always, feel free to reach out If you have any questions or need further assistance.

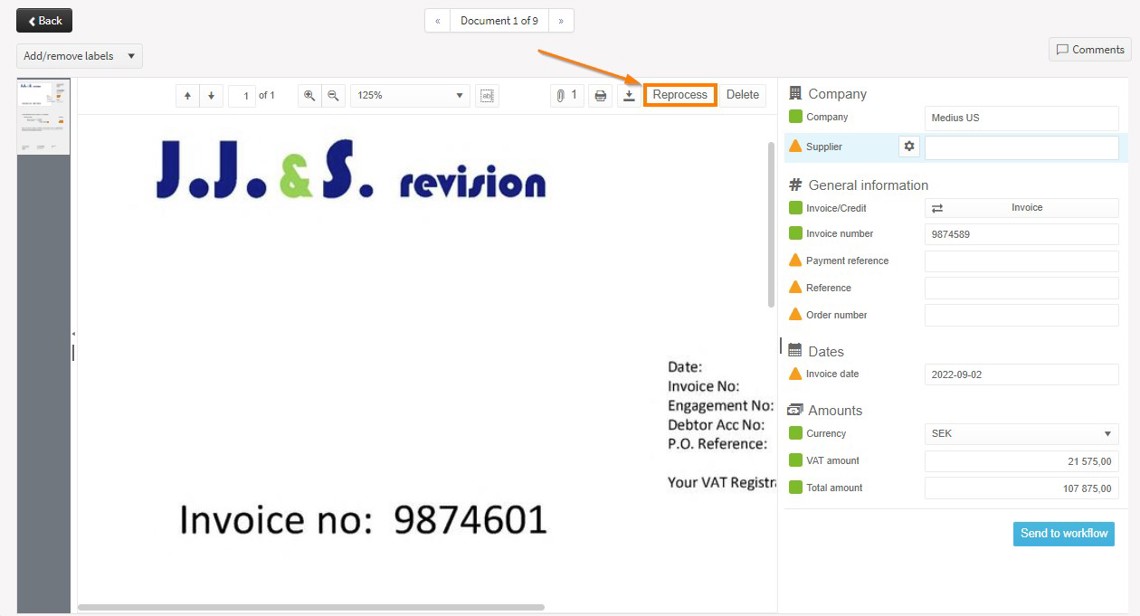
Reprocessing invoices in Capture
We know that you often receive multiple invoices from the same supplier simultaneously - perhaps they send their invoices in bulk at the beginning of each month.
We also understand that Capture might not always correctly identify a field, or a supplier might change the layout of their invoices. It can be frustrating to correct the same error across multiple documents. That's why we've introduced a new feature in Capture for reprocessing invoices, allowing you to leverage machine learning on invoices that have already been imported!
To use this feature, simply click "Reprocess" on the invoice you are verifying. You'll have three options:
- This invoice: Reprocesses the current invoice. If learning is available, it will be applied immediately, showing the updated changes.
- All invoices with this supplier: Reprocesses all invoices in the Inbox from the same supplier as the current invoice.
- All invoices with no identified supplier: Reprocesses all invoices in the Inbox from the same receiving company as the current invoice but without an identified supplier - ideal for invoices from new suppliers!
Moreover, you can enhance this process with Touchless Automation in Capture. By turning on Touchless Automation before reprocessing, any invoice that meets all green criteria will automatically advance to the workflow.
Gain line level reporting visibility on non-PO invoice spend
Here's a Medius Top Tip that many customers have applied to improve their spend visibility.
The ability to identify how much you're spending on certain items or categories and then perhaps consolidate that spend and gain up front control through a contract or via a PO really provides the visibility and control you need to reduce maverick spend.
With Medius, you can:
- Use line level capture of non-PO invoices, now with configurable columns.
- Do not add empty coding lines per captured invoice line for non-PO invoices - configured at the company level and/or supplier level.
- Use the business reporting data source to include line level details that then support in-report filtering and searching on "Item Description" in the same way you can use similar filters across all columns and for all invoice types.
Note that some Medius environments have a customization that always removes invoice lines from Non-PO invoices after the Verify step. If this is the case, let us know and we can turn off the customization.
Adding Quick Links to Medius Admin Pages
For those of you that are Medius Admins and are working to tune and configure the platform, hitting the ~220 admin pages can be challenging, particularly when some are not really intended to have a Business Admin use.
By default, Medius provides a list of Admin Quick Links as below but you can add your favorites that you frequently use.

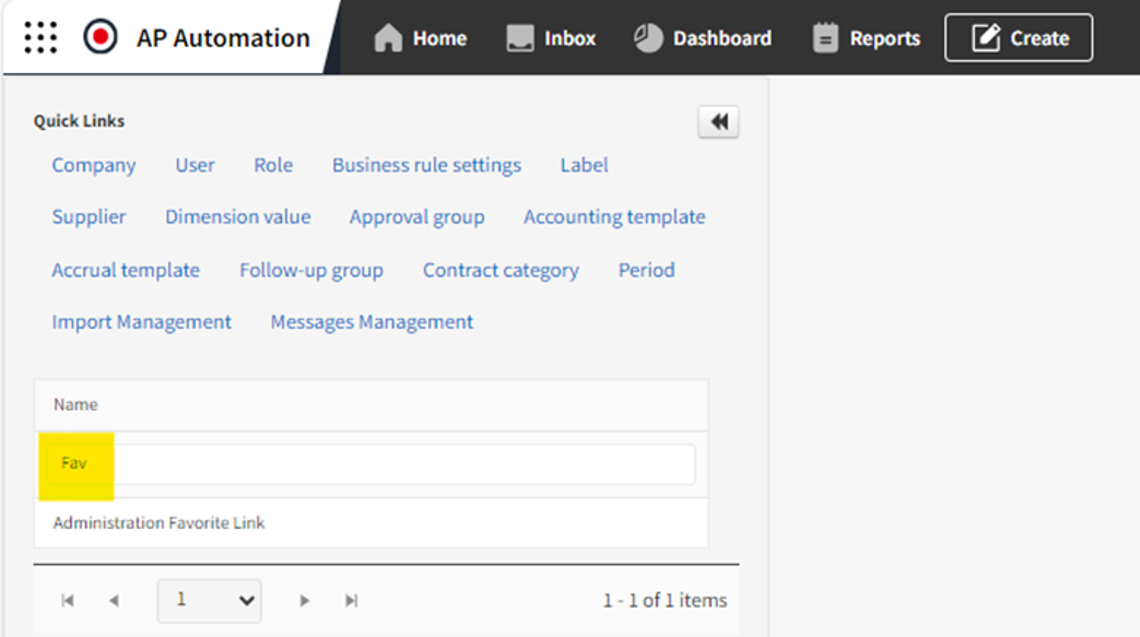
Click "Add" and search for your frequently used Admin Page such as "Routing" for the Routing Table

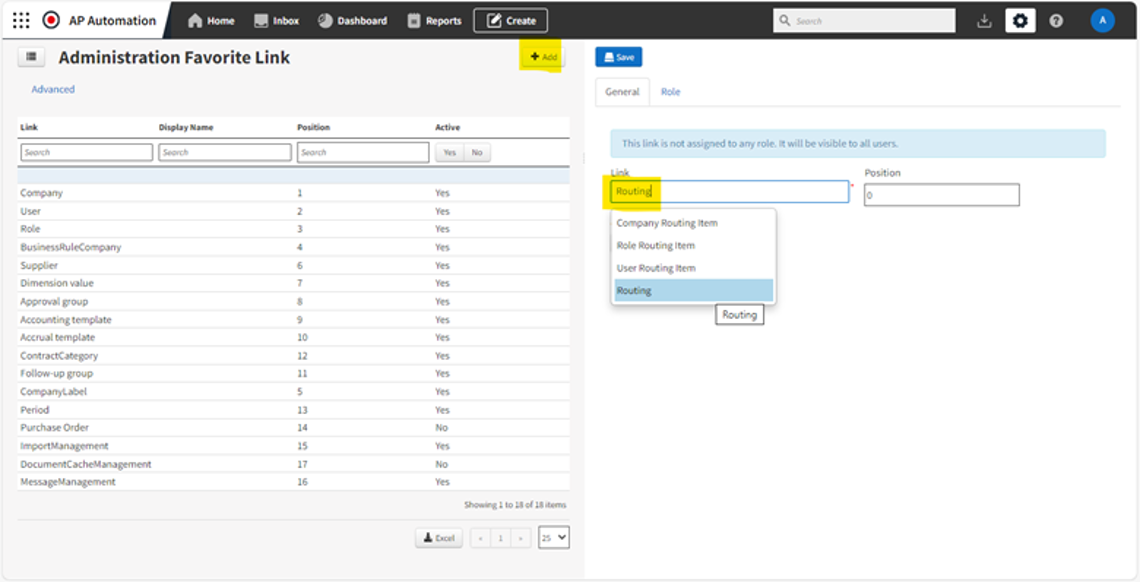
Then, switch to the "Role" tab and apply the role you wish to have access to this quick link - typically, Admin role.
Don't forget to "Activate" the quick link and "Save".
Then, you have a new, convenient quick link:


Of course, you can find full details on the Medius Success Portal.
Dashboards v Reporting v Analytics
Medius Dashboards, Reporting and Analytics all have their place and part to play in your AP operations but what are the differences?
Users sometimes wonder why they can't see an invoice in a report when they can see it in the AP Invoice Search dashboard, for example.
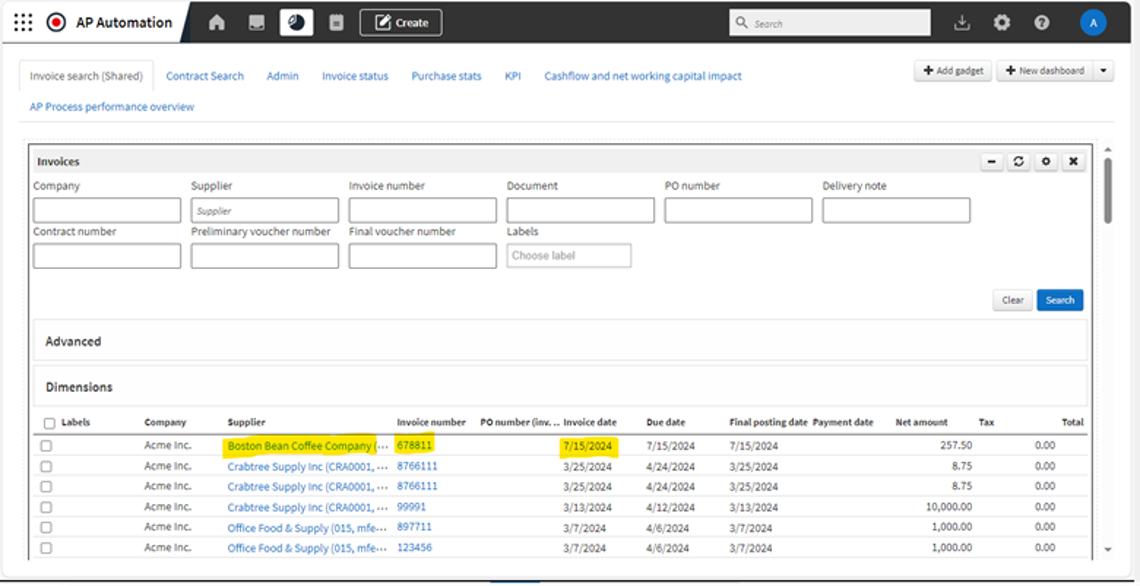
Dashboards
Imagine an invoice from the Boston Bean Company has been submitted to workflow and you immediately want to go see where it is. Medius AP Automation is deployed with preconfigured dashboards to get you started, along with a set of gadgets you can use to configure your own dashboards.

Reporting
The benefit of these business reporting options is that you have rich, configurable reporting across a number of reporting sources that allow for in-report grouping, totaling and filtering with drill-down to the underlying document along with report scheduling and the ability to pull the report data via Odata.
Sweet!

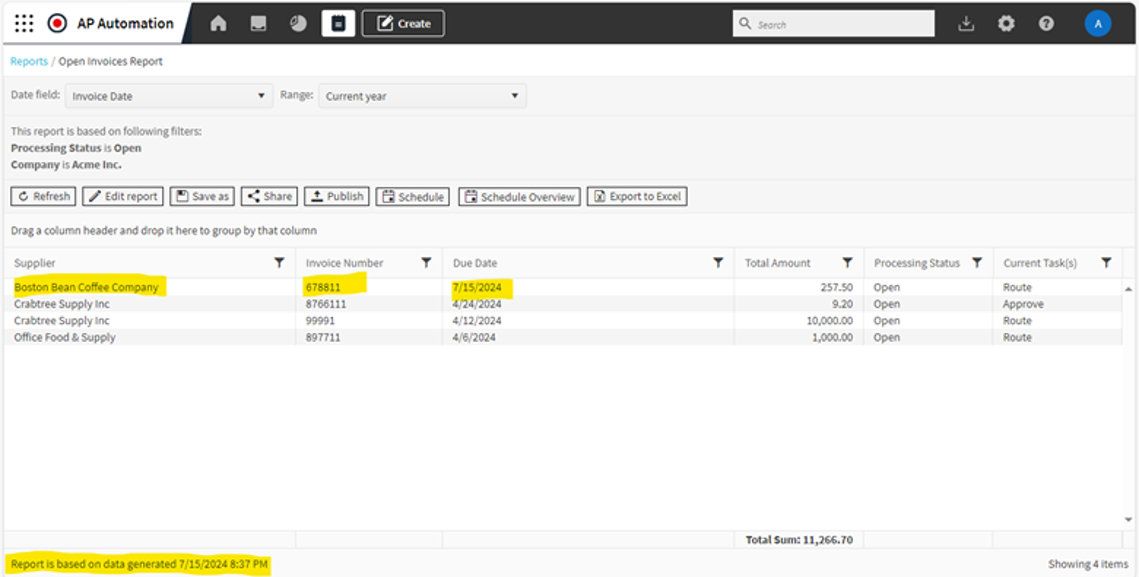
Notice when running business reports, there's information at the bottom left indicating when the report data was last updated. To provide this reporting functionality and minimize any impact on your operating environment, we have a separate reporting database meaning that there is a delay between an invoice hitting the workflow (transactional database) and actually being available for inclusion in these business reports as above. By default, the data is synchronized to the reporting database every 15 minutes.
(For those interested, some report data sources are updated according to the Medius.Reports.Infrastructure.Reporting.ETL.EtlScheduledJob, while others are updated constantly. For more information, see EtlScheduledJob.)
Analytics
For those that have Medius Analytics as part of your subscription, you gain benefit from a number of prebuilt PowerBI overlays that present detailed analysis of your workload and processes with the aim to drive continuous improvement and actionable insights:

These analytics dashboards are presented from an analytics database and include visualizations of trending over time. The data refresh for Analytics is not configurable by customers and is managed by Medius.
However, customers can see when the Analytics data was last refreshed by following "AP Insights->QA" and clicking the "information" symbol at the bottom right of the screen.

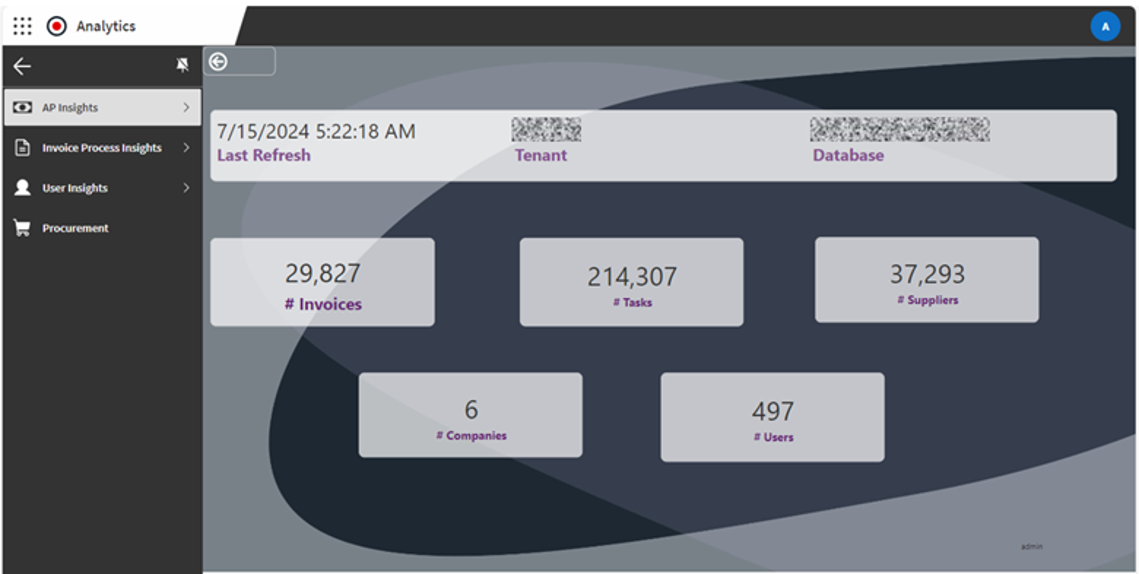
For more information on Medius Analytics, please see the Medius Success Portal.
Identifying suppliers that are causing you extra work
With Medius Capture, we continue to drive the highest levels of touchless capture possible but in the real-World you're operating in, invoices can hit the workflow that need updating due to incorrect or missing data.
It's almost like the supplier doesn't want to be paid on time!
Correcting the invoice type, changing the supplier, adjusting the tax amount or adding a freight charge, these changes require invalidating, editing, and resubmitting the invoice - "ain't nobody got time for that" (as the famous meme goes).
With Medius Analytics, you can utilize the First Time Right dashboard to quickly identify and track changes made to invoices. This view helps you pinpoint which suppliers are sending invoices with incorrect information, allowing you to address issues directly with them and save valuable time.
For example:
"This quarter, you sent us 37 invoices without a purchase order number. Please ensure the order number is included on future invoices to avoid processing delays and risk late payment."
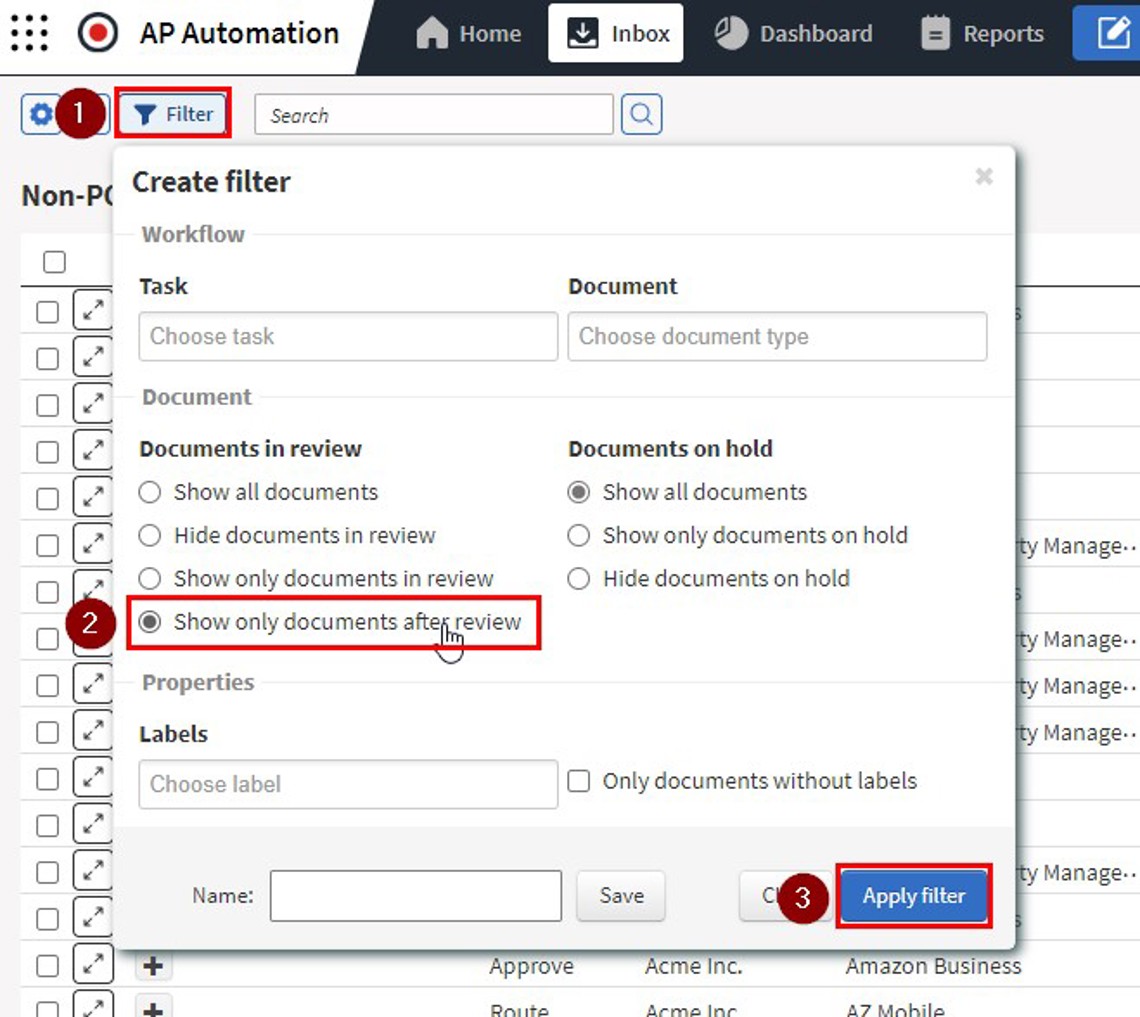
Filtering invoices that have been returned from Review
Did you know that it is possible to filter invoices in your inbox, where a user has completed a review?
If you use the Review workflow step in your organization, it was previously hard for AP users to keep track these invoices. This is now possible using an inbox filter! You can simply:
- Go to "Filter"
- Select "Show only documents after review"
- Click "Apply filter"
This update aims to streamline your process, making it quicker to find the invoices you need to act on.

Pre-Approved Invoices
In version R118 we released a feature called Pre-Approved Invoices. It was a developed as a solution for AP users who said they were spending unnecessary time coding and approving Non-PO invoices that had been pre-approved, or did not require approval at all. Some examples of invoices that fit this description were:
- Intercompany invoices
- Invoices with very small amounts
- Invoices that have been pre-paid
By configuring Pre-Approved invoices, you can specify which suppliers, amounts, coding dimensions or key words (or any combination of these), that should trigger a pre-approval flow. This way AP users don't have to spend unnecessary time handling Non-PO invoices that can just be posted.
Check out this link for more information.
Save time by autocoding in Post Control
Do you find that some invoices stop in the Post Control because they are out of balance by a small amount? Then you, or someone in your team, have to spend time coding the tiny amount before posting the invoice to your ERP. Some scenarios that might cause this issue are:
- The supplier has not specified a rounding difference on the invoice, which causes the net + tax to not equal the total
- On orderbased invoices, many tiny rounding errors in unit prices cad add up to a difference in the balance
- Accounting templates that do not fit 100%
To avoid spending unnecessary time coding these small imbalances - check out this video on how to configure "Automatic coding of balancing". This can be done for both Non-PO and PO invoices.
PS! In some cases the same thing can happen due to an imbalance in the tax amount. In that case it can be automatically adjusted by configuring a tax tolerance. Check out this video to see how to configure it.
Stay updated with Medius!
Just a heads up - we're constantly adding new features to Medius AP Automation. You can find all the details in our monthly Release Notes, which also cover updates to other modules like Medius Procurement and Medius Pay.
If you'd like to get an email when new updates are out, ask your Medius Administrator to add the "Medius Info" role to your profile. This way, you'll always be in the loop!